Prep. Images is a simple application to help prepare photographs for publishing on the web. One at a time, images are displayed so that you can place (via mouse or keyboard) and add a copyright image in one of the corners. Images can also be resized (and sharpened), if required.
Prep. Images was designed to be run as a Nautilus script so that you can select a load of images in Nautilus and prepare them for publishing. It currently proves the following features:

- visually pick a corner to overlay a copyright image
- work on a series of images quickly and with minimum effort
- optionally, resize (and sharpen) images
Prep. Images is written in Python.
Getting Prep. Images
Prep. Images is free/libre open-source software, available under the terms of the GNU General Public License version 3 or later.
Download
You can get it here…
Download Prep. Imagesversion 0.115K
Installation
To install, run the usual three commands:
$ make
$ make install
You may need to be root to run the final command.
Documentation
Setting up Nautilus
Prep. Images was designed to run as a Nautilus script. To set this up you will need to create a symlink from your nautilus-scripts directory to the prep-images binary. On my system, the following did the trick:
You can also run it from the command-line. prep-images expects a list of image files passed as program arguments.
Setting preferences
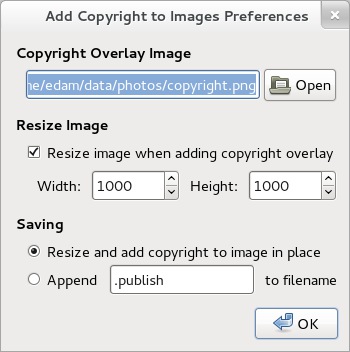
Copyright Overlay Image
Select the copyright image that you want to overlay on your photographs. Typically, this might be a PNG with a transparent background that contains a copyright message.
Resize Image
If enabled, the image will also be resized as the copyright image is applied. You will also need to specify a maximum width and height to resize the image to. A small amount of sharpening is also performed after resizing.
Saving
Here you can choose to
alter the image in-place (physically overwrite the image file with the new, resized and copyright overlayed image), or
append “.publish” (or some other tezt) to the filename and save to a new file, leaving the original unmodified.
Adding the copyright image
When you first run Prep. Images, you will need to set up the program’s preferences. Until you do, you will not be able to overlay a copyright image.
The images you selected in Nautilus (or passed on the command0line) are displayed one at a time. For each one, choose which corner of the image you want the copyright overlay to be applied to by doing one of the following:
- click in a corner of the image, or
- use the arrow-keys then press enter
The image is immediately altered (or a new image is saved), as per your preferences.
Development
You can always drop me an email. Feedback and suggestions are always welcome.
Bugs
Please report bugs at the project’s development site:
Repository
You can obtain the latest development code from the bazaar repository at:
http://bzr.ed.am/gtk/prep-images


